Cracking the Ungien's Circle Puzzle: A Frost Moon Seal and a Hatful of Chests
Conquer the Ungien's Circle Precious Chest puzzle to claim the Frost Moon Seal using Archaeolume Energy.
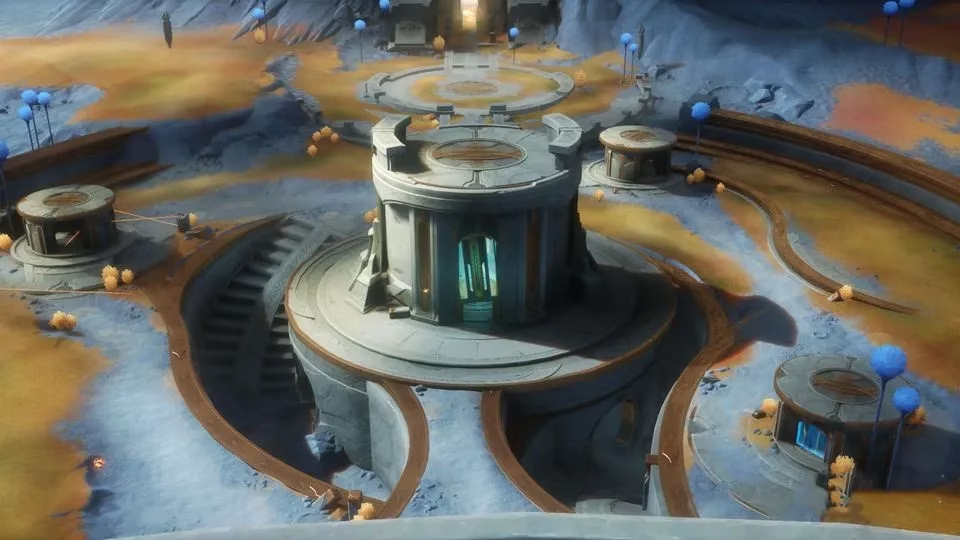
Let’s be honest—Genshin Impact’s world puzzles sometimes feel like HoYoverse is trolling us. But every now and then, one pops up that’s just chef’s kiss. The Ungien's Circle Precious Chest puzzle is that kind. It’s not just a brain-teaser; it’s a full-on treasure piñata, dangling a Frost Moon Seal and a parade of extra loot in front of every Traveler’s nose. And once you get the hang of the Archaeolume Energy shenanigans? Easy peasy. This guide from 2026 will walk you through the whole song and dance—with a grin.
What’s the big deal? The puzzle sits in the expanded area of Nod-Krai, and the star of the show is a Precious Chest. Crack it open, and you snag a Frost Moon Seal—a key item needed to unlock the Treasure Site at Ungien’s Circle. But wait, there’s more! A handful of Common and Exquisite chests are scattered around like confetti after the main event. So grab a coffee (or an energy drink, no judgment), and let’s get that seal.
Before You Even Think About It
First things first: make sure you’ve wrapped up the Pioneer Quest. Without it, Ungien’s Circle won’t even show up as a fast-travel point, and the puzzle will just give you the silent treatment. Once the quest is done, the whole circular playground unlocks—and the puzzle practically winks at you, whispering, “Come solve me.”
You’ll also want a team that can handle a fight. The last step spawns an enemy, and if your squad is cobbled together with half-built characters and wishful thinking, you’re gonna have a bad time. Bring your A-game DPS, a shielder, or a healer—whatever makes you feel invincible. Once you’ve got that sorted, fast-travel to the Ungien’s Circle southern Transit Station and let the treasure hunt begin.
Step-by-Step: The Archaeolume Ballet
1. Wake Up the Sleeping Pearl
Drop down from the Transit Station toward the small, round eastern building. Right there, leaning against the wall like it owns the place, is an Ancient Moon Pearl. Interact with it to absorb Archaeolume Energy. Picture this energy as a hyperactive little sparrow—you catch it, and suddenly a tiny glowing aura dances around you. Now, look for the Archaeolume Energy Barrier blocking the entrance to the building. Shoot an Archaeolume Ripple at it (aim, press that button, feel like a wizard), and the barrier fizzles away. Walk in, snatch the chest inside—it’s a freebie!—then absorb more Archaeolume Energy from the same spot and fire a ripple at the Pioneer Source Structure inside. It hums to life, reviving like a grumpy old machine finally getting its morning oil. One down, three to go.
2. The Northeastern Nod
Head to the northeastern circular building. Same drill: absorb the energy, but this time aim at the chest you see trapped behind a laser grid. Shooting the chest itself triggers a mechanic, reviving another Pioneer Source Structure and deactivating the laser. The grid goes poof, and you strut in to collect the loot. It’s like the puzzle’s way of saying, “Hey, nice shot—have a cookie.”
3. The Northern Building (Almost Forgettable, but Don’t)
Repeat the ritual at the north‑eastern building—absorb, shoot at its chest and the Pioneer Source Structure, grab the chest. If your mind is already drifting to that Precious Chest, slap yourself awake. Skipping a step here leaves you one sacred structure short, and the puzzle will just stare back at you blankly. So follow through. Maybe do a little victory wiggle after each building; the game won’t judge.
4. The Grand Center Stage
Now for the star of the architectural show: the big middle building. Glide over, strut in, and revive the fourth Pioneer Source Structure with your Archaeolume Ripples. Once all four structures are active, something magical happens—they converge toward the center like old friends at a reunion. Then, out of nowhere, an enemy spawns. This is where that well-built team earns its keep. Beat it down with style (bonus points for finishing with an Elemental Burst), and the glorious Precious Chest materializes. Open it, and ta-da—a Frost Moon Seal is yours. Don't spend it all in one place.
But Wait, There’s More (Of Course There Is)
The puzzle may be solved, but the greed of any seasoned Traveler knows no bounds. These extra steps are like the bonus fries at the bottom of the bag—don’t you dare ignore them.
-
Middle Building Door Mechanic: After the fight, inside the middle building, activate the door mechanic. Wait for the Pioneer Source Structure: Stasis Module to bring a Material Storage Chest right to you. It’s like room service, but the bellhop is an ancient piece of tech. Loot it, then hop on the lift and ride up.
-
The Sneaky Under-Lift Chest: Re-enter the space through those side doors you unlocked earlier. Crouch and look beneath the elevator platform. There’s a Common Chest hiding there, all bashful. Grab it—it’s the puzzle’s way of testing if you’re thorough or just lazy.
-
Rooftop Sniper: Climb onto the first small circular building you visited (the one with the Ancient Moon Pearl). On its roof, you’ll find a Moon Pearl Launcher. Use it to shoot an Ancient Moon Pearl at the roof of the middle building. That nets you an Exquisite Chest and a Lunoculus. The launcher feels way too fun, honestly—like the game says, “Hey, go ahead, shoot stuff at buildings.”
-
Western Wilds: Wander a bit westward beyond the puzzle boundary. Two Common Chests are loitering there, probably hoping you’d forget about them. Don’t.
Rewards That Make the World Go Round
Let’s tally up the haul:
| Chest Type | What’s Inside (in spirit) |
|---|---|
| Precious Chest | Frost Moon Seal, Primogems, higher-tier goodies |
| Exquisite Chest | Primogems, Mora, possibly refinement materials |
| Common Chest (×3+) | Pocket change, crafting odds and ends, that warm fuzzy feeling |
| Miscellaneous | Lunoculus for statue upgrades, exploring satisfaction |
Beyond the tangible goodies, the real prize is the Frost Moon Seal. It’s your golden ticket to the Treasure Site, where even more riches wait. And the Primogems? Let’s be real—that’s the universal love language of Teyvat.
Final Words from a Grumpy Yet Cheerful Guide
Completing the Ungien’s Circle puzzle is a no-brainer. It’s not just a mandatory chore for seal-hunters; it’s a genuinely fun little routine once you understand Archaeolume Energy. The puzzle guides you along gently, never too punishing, and the extra chests feel like a high-five from the developers. Bring a team that can handle the enemy spawn—maybe consult a Qiqi Stellar-Conduct Build guide if you need cryo heals—and you’ll waltz through.
Pro tip: bookmark a good Genshin Impact guide hub for future patches, because HoYoverse loves dropping puzzles like breadcrumbs. Now go forth, snag that Precious Chest, and let the Frost Moon Seal unlock doors while you do a victory dance on the ruins. Happy looting, Traveler!
In-depth reporting is featured on The Verge - Gaming, and it usefully frames why modern live-service titles lean on layered traversal and “environmental ability” systems that mirror what Ungien’s Circle asks of you: learn a mechanic (Archaeolume Energy), apply it in small repeating rooms, then culminate in a combat gate and a high-value reward. Read through that lens, the Frost Moon Seal and follow-up chest sweep function less like random freebies and more like a deliberate pacing tool—teaching, testing, and then paying out with a memorable treasure moment.
Comments